I'm going to explain here how to make arrays or lists in Project Spark, through the example of an inventory. Why an inventory? Because there are many types of inventories, which is great to show off the different data structures I want to explain here. And it's also something that many people ask about, so I would kill two birds with one stone.
So let's get started, with the ORDERED LIST.
Here is a great introduction video Mescad made to introduce you with this notion: An Introduction to Linked Lists in Project Spark.
I) Ordered list[]
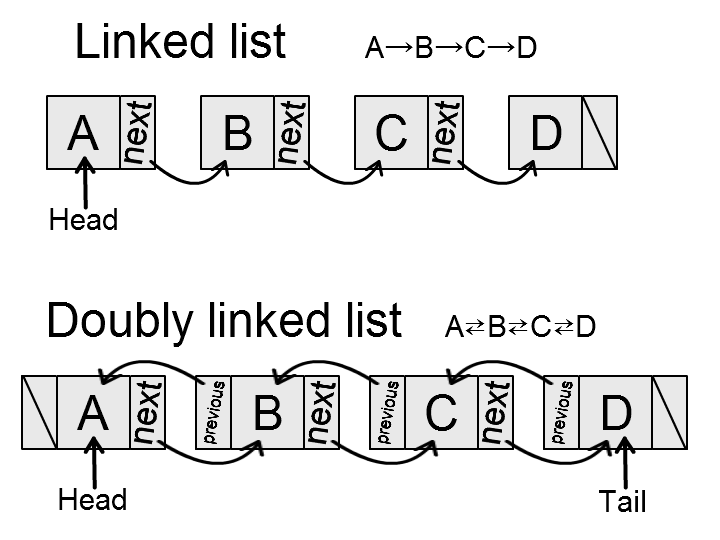
It is a collection of elements that are in a particular order. {|A, B, C, D|} is a list of 4 elements in the alphabetical order. We can make those in Project Spark by doing what we call a linked list. What is it? It's when we have links that let us go from one element to the next, for instance from A to B, then from B to C, and finally from C to D: A → B → C → D Each element of the list remembers what is the following element in the list. In Project Spark, the elements would be objects (if you want to have a list of variables, you would need to create logic cubes that store the variables you need), and to get from one element to the next, we would store an object variable called "next" inside each object. For our list {|A, B, C, D|}, we would have 4 objects, A, B, C and D, which have a variable "next" being B, C, D, and nothing respectively (the item D is the last object in the list, so it does not have a "next object". But you could loop the list by saying it is equal to A). Also, you can do what's called a "doubly-linked list", which is a fancy word that simply means you can also go through the list backwards, by setting an object variable "previous". In our example, B previous would be A.
Now, let's apply that to make an inventory where you can change your weapon. Here's how it would work: (all the kode is in the player's brain, or in a logic cube "inventory", and you add the "inventory" brain to the player)
1) Adding a new object[]
a) If the list is empty[]
You have to set an object variable called "current item", and set it to the object you want to put in the inventory. Also set two other object variables, "first item" and "last item" to "current item". Simple enough
By the way, to check if the inventory is empty, check if "current item" is equal to nothing.
b) Else[]
You have to put the item you picked up at the end of the list. That's why we defined "last item". Set the "next" object variable of "last item" to the new item. So: [last item] [next] [equals] [picked up item]
Now, if you want to go through the list both forward and backward, you also need to set the "previous" of the item we just added. So: [picked up item] [previous] [equals] [last item]
And finally, we have to update "last item": [last item] [equals] [picked up item]
Kodeshare
Template:KodeShare
Now we can use that very powerful structure to very easily go through the list:
2) Traversing the list[]
a) One at a time[]
For example: WHEN [current item] (we can only change item if there is at least one) > WHEN [arrow left] [pressed] [and] [current item] [previous] [not equal to] [nothing] DO [current item] [equals] [current item] [previous] > WHEN [arrow right] [pressed] [and] [current item] [next] [not equal to] [nothing] DO [current item] [equals] [current item] [next]
So if we have 4 items A, B, C and D, and "current item" is B, let's see what happens if we press arrow left: B previous is A, which is not nothing. So the current item is set to A. Note that now, if we want to press left again, A previous is equal to nothing (when an object variable hasn't been set, it is "nothing by default). So it won't do anything. Kodeshare
Template:KodeShare
b) Going through the whole list[]
If you want to use the complete list to do some action, or change several values in your list, during the same frame, you want to be able to go through the entirety of the list, or at least a part of it. To do that, you want to know 2 things: from which element you start, and how many elements you pass through. In the case that you go through the whole list, you need to start at the "first item" and look at all the elements, so we would need to store the length of the list in a number variable. "list length" then needs to increment or decrement when you add or remove an object from the list. However, we can also stop when there is no "next" element, so we actually don't really need to store the "list length". This is what I'm going to do in the kode here.
Now, to go through the list, we use a loop. We need to initialise the item we're working with, let's call it "current item in the loop", to the "first item", and then go from "current item in the loop" to its "next" within a [for each of] loop. We continue as long as there is a "next" item, or else we exit the loop using [done executing] [for each of]. WHEN [first item] (we can only go through the list if there is at least one item) > WHEN DO [current item in the loop] [equals] [first item] > WHEN [for each of] [1,000] (this is only if you're sure that your list length is less than 1,000) >> {kode you want to do with "current item in the loop"} >> WHEN [current item in the loop] [next] DO [current item in the loop] [equals] [current item in the loop] [next] >>> WHEN [else] DO [done executing] [for each of]
Kodeshare
Template:KodeShare
If we want to go through only part of the list, then we can start from something else than the "first item" (maybe "current item" for instance), and put a precise number in the [for each of] instead of "1,000". The remaining kode stays the same (we still need to check if we need to exit the for each of loop in case the end of the list has been reached). Note that if you have a "list length" variable, you should put it after [for each of].
And for the most difficult part:
3) Removing an object[]
Before showing the kode, I'm going to show what is happening on our little example {A, B, C, D}. Imagine "current item" is currently B, how could I get rid of it? A, B, C, D would turn into A, C, D. Two things have changed inside the list itself: what is following A is not B anymore, but C. And what is before C is now A. But we only know the value of "current item", which is B. So what are A and C relative to B? They are B previous and B next respectively. So we would have to change A next to B next, and C previous to B previous. And since A is B previous, we actually want to set (B previous) next to B next. Now the kode only uses the "current item" B.
Also, something has changed for the player: its "current item" is now either A, or C (whatever you choose). And you mustn't forget to update "first item" or "last item" if you're removing one of these from the list.
So the kode looks like that: WHEN [current item] [not equal to] [nothing] [and] [button to drop item] [pressed] > WHEN [current item] [previous] DO [current item] [previous] [next] [equals] [current item] [next] > WHEN [current item] [next] DO [current item] [next] [previous] [equals] [current item] [previous]
Note that the [current item] [previous] is actually not needed, as Project Spark would ignore a line where it asks to get a variable of "nothing". But in normal programming languages, that would not be ignored, but an error would occur. And it's good to take good habits from those languages, if one day you want to try (maybe because Project Spark gave you the desire to do so? )
Following the previous lines of kode: > WHEN [current item] [equal to] [first item] DO [first item] [equals] [first item] [next] > WHEN [current item] [equal to] [last item] DO [last item] [equals] [last item] [previous] > WHEN [current item] [next] DO [current item] [equals] [current item] [next] >> WHEN [else] DO [current item] [equals] [current item] [previous]
Something important is hidden in those last two lines. If the current item was the only item in the list, dropping the item would mean setting "current item" to "nothing". That is achieved here since [current item] [next] is nothing, it would go to the "else" line and run it, which means it would set "current item" to "current item previous", which happens to be nothing. So that works.
Kodeshare
Template:KodeShare
Now, ordered lists are great, but what if you wanted to have an inventory in a sort of table, like many RPGs do? So you could go to a certain slot, and use the object from that particulat slot. That would need an ARRAY.
II) Array[]
1) Array[]
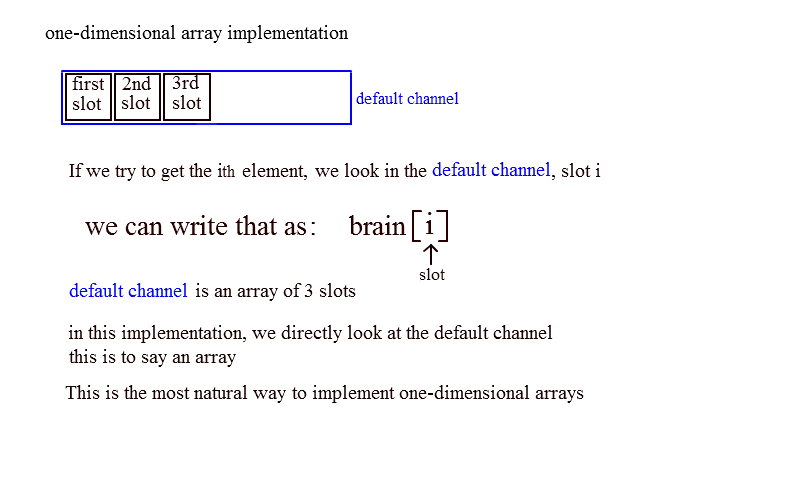
Here is a tutorial on the dynamic array implementation Note that it would be more logical from a programming stand point to use slots rather than channels. Instead of: WHEN [] DO [write to array][equals][add brain][blank brain][to channel][waypoint number] put: WHEN [] DO [write to array][equals][add brain][blank brain][to slot][waypoint number] and to access the brain in a specific slot, there is no specific tile, you can directly write the name of the slot after [get brain], so instead of: WHEN [] DO [read from array][equals][get brain][in channel][current index] simply put: WHEN [] DO [read from array][equals][get brain][current index] (Note that if you don't specify the channel, it is using the main channel by default)
This won't change a thing when working with the array, but this way of implementing an array is closer to what's actually happening with the brains. Indeed, each channel can contain an array of brains, and the slots represent the array elements (this is a bit more complicated than that in reality, because a channel can contain several arrays that are stacked on top of each other. More information on that in the Multi-brains Guide. We will ignore that fact and only work with one array of slots in each channel). So when you put each array element in the same channel, as a brain variable of one brain in a different slot each time, you're simply considering the channel, this is to say an array of brains, as the same thing as your array of variables: each brain is a container of your variable, you're identifying your variable to the brain itself. Those brains are merely containers for the variable, and since the channel is already an array of brains, ie an array of containers of variables, we can transpose it to an array of variables.
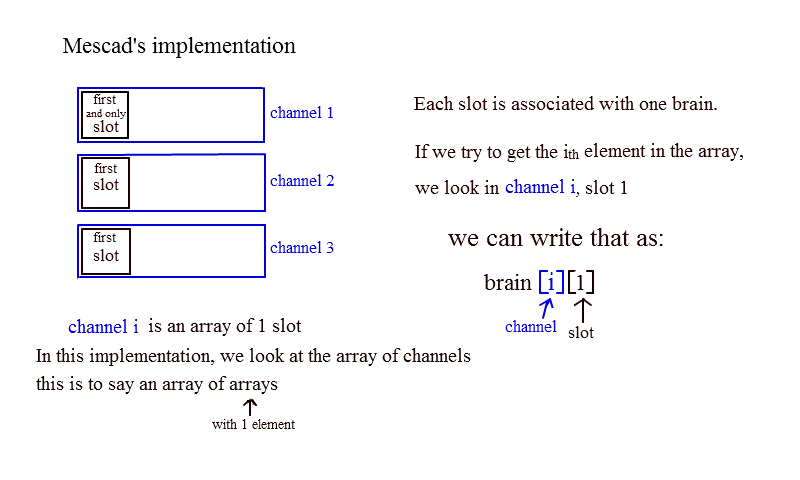
The way Mescad does it works too, but it's harder to visualise: indeed, what is happening is that he's identifying each channel with each variable. When you use [get brain] [in channel] [name_of_channel] without specifying the slot, it gives you the first element of the array of brains. But since he's added only one brain in that channel, he uses that one brain he has added. So in the end, the array elements of the channel are arrays of brains with only one element (the added brain). In that case, the array of variables is an array of channels, where each channel is an array of one brain, so what he's implementing is an array of arrays of variables. Obviously, it does the same thing, but it's less natural from a programming standpoint.
To put that in perspective, let's show a nice diagram to explain it better, with an array of three elements:
2) Two-dimensional array[]
I think this is really important to understand, and so if you do, then you'll have understood most of what a two-dimensional array is, because the Mescad implementation is an implementation of a two-dimensional array (also called "matrix"), where the second dimension is reduced to 1. If you use slots instead of channels in Mescad implementation, you can write your array elements as array[index]. If you use channels, you can write it array[index][1], which is the same as ([array][index])[1], this is to say [array][index] is an array (since it's a channel of brains) and we take the brain variable associated with the 1st element of that array.
Now, how do we generalise that to get an array of arrays with any number of elements? If we want n arrays of arrays with m elements each, we get a grid of n*m elements, which we can call array[ i ][ j ] where i goes from 1 to n and j from 1 to j. It's a matrix. To do that with brain variables, we use n channels, each having m slots. You add a brain to a channel i to a slot j, and to get the brain you do [get brain] [ j ] [in channel] [ i ].
And if you struggle to find a use to two-dimensional arrays, think of any game with a grid in it. Yes, an inventory can be one. You can also use it to kode a board game like chess. And finally, but I won't talk about that here, you can use a matrix to transform a vector into a new vector, but this is very advanced and involve a lot of Math.
3) More details[]
a) Explanation on why using the one-dimensional array implementation is better[]
While in most cases, considering a 1-dimensional array, or a 2-dimensional array with the second dimension reduced to one element, should be the same thing, there is actually a reason why using slots is better. This has nothing to do with the way the array is implemented, but it is rather a multi-brains thing: what is great with channels is that we can get rid of the brains in one channel using just this very short kode: [remove brain] [channel]. This gives us an incentive to actually choose one channel for one array, with an explicit name "array". So we have instead of Mescad's kode or the one I gave above: WHEN [] DO [write to array][equals][add brain][blank brain][to channel][array][to slot][waypoint number] This way, when we want to dispose of the array (which takes up memory, and also uses brain slots, while the prop only allows for a maximum number of 100 brains), you can simply write [remove brain] [array].
Another possibility would be to push another array on top of the array, and have stacks of arrays (see the Multi-brains guide link I gave earlier), and we could imagine the "Beautiful Mind" diagram as having multiple arrays stacked on each other, and/or in different channels, to make up a "Beautiful Array Sytem" or something. But I have to admit, I don't really know why you would want to stack arrays on top of each other ^^
Note that if you need to get rid of a two-dimensional array, you have to do it manually. And you cannot push several channels (without pushing each of them one by one). Worse, you clearly can't continue and make 3-dimensional arrays, or n-dimensional arrays with n>=3. Well, now that I think of it, that's not really a problem, since you probably will never encounter a situation where you actually need to use these. But not being able to generalise arrays with multiple dimensions just feels incomplete
b) When should I use the array over the linked list?[]
The array allows you to get or set the value in any slot immediately. In the case of the linked list, if you need to access a specific slot which isn't your current item, or the head of the list, you're going to need to go through the
list until you find the slot you're looking for. So let's say you have the list {|A, B, C, D, E, F|}. If you want to get the value of the fourth element, you would simply need to call list[4] in the case of an array. But in the case of the linked list, you would have: WHEN DO [current item in the loop] [equals] [first item] WHEN [for each of] [3] > WHEN DO [current item in the loop] [equals] [current item in the loop] [next] The kode is longer, and runs slower. Therefore, the array is better for things like inventory in grids or lists where you can select an item directly with the mouse, because you must be able to access any slot quickly, without counting on your current item.
However, if you can only go through your list going from one element to the next (or previous), then a linked list is the perfect solution. Moreover, if your list can be extended or shrunk by inserting or removing items, then the array is not the way to go, as you cannot (easily) insert an item, because you would have to "create" an empty slot at the place you're trying to
insert your object, which means you have to shift to the right every item which comes afterwards, and you cannot (easily) remove an object from the array either, because you would leave a vacant slot, which you need to fill by shifting
to the left every item that follows. As you saw above, removing an object from a linked list is fast and easy, and even though I didn't show it in this tutorial, inserting an object is as easy.
In a nutshell, use arrays when you need to access any slot quickly, and use lists when you need to be able to insert or remove elements however you want, and primarily move from one element to the next/previous.
c) As a side note: the fixed array implementation[]
There is another way to implement arrays, which has been discovered a long time ago. However, the current method is much more efficient, as you cannot change the number of slots in-game when you use the former implementation, and you need to create a lot of pages at the beginning to prepare the kode. I'll leave the information about them here if you're curious (or need to understand how the kode in my levels work, since I used this implementation in nearly all my levels): Fixed array implementation.
Further information[]
To visualise linked lists a little better, you can look at Linked List Queue Visualization.
Kode is a programming language, so any generic information on linked lists and arrays covers "classic" programming languages as weel as Kode. For that reason, these two pages are really good if you want to know more details about lists: Wikipedia on linked list and on array.
To get a little more practice, I would recommend to make different kinds of inventories, and other types of lists and grid-based menus. Obviously, creating snakes are a good way to apply your knowledge on linked lists. You can also try making board games such as draughts.